Paper Mache

Lets Talk About Papier Mâché

The term “papier mâché” is derived from the French words papier (paper) and mâché (chewed or crushed), and it refers to an art form in which paper is softened and shaped. Waste paper is mixed with water and a binder to create a paste. This paste dries into a hard surface, allowing for the creation of any shape, even very complex ones. This versatile art form is ideal for making lightweight, durable objects and is used to produce a wide variety of works, such as decorative items, masks, and sculptures.

The history of paper mâché dates back to ancient China around the 2nd century BCE, where it was first used to create sculptures and masks. The technique spread to the Islamic world and later to Europe during the Middle Ages, where it became popular for making decorative objects, boxes, and furniture. By the 17th and 18th centuries, particularly in France, paper mâché was refined into a fine art, used for creating intricate and lightweight furniture and decorative art pieces. Today, it continues to be a popular medium in both crafts and modern art.

Paper mache is a handicraft technique made using paper pulp. In this technique, pieces of paper are mixed with water and glue to form a dough. This dough is used to create various shapes. It is usually used in various art and handicraft projects, such as sculptures, masks, decorative objects.

How I Create My Works?

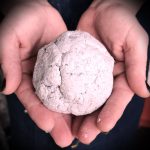
When making my products from paper pulp, I handle all stages myself, from the beginning to the end. I use waste paper and cardboard from my friends’ workplaces, my children’s used papers, egg cartons, and many other similar waste paper and cardboard materials. Everyone around me—my friends, my friends’ friends, shopkeepers I buy from—are aware of what I do and instead of disposing of these materials, they save them for me. I tear these papers and cardboards into small pieces, soak them in water for about a day, then squeeze, shred, and mix them with flour and glue to make a pulp. Then comes the design stage. I sometimes complete my product in one go, or occasionally in 2-3 sessions, waiting for it to dry intermittently. Depending on the temperature, I have to wait for about a week for the piece to fully dry after completion. Once the piece is completely dry, I do various finishing touches. Sometimes I leave my works in their natural color, while other times I add color. For coloring, I use acrylic and oil paints. I can also use many kinds of materials such as epoxy resin, natural semi-precious stones, glass shards, sand, wooden branches, and many others. To ensure durability, I use non-yellowing water-based varnish in the final stage. 

Now it’s time for photography. I particularly handle the photography myself. Because nobody else knows the exact color of my work and the texture parts that need to be revealed better than me. of my work better than me. 

Finally, it’s your turn…